Introduction
Wall cracks are one of the most common problems in homes, and they often appear even in buildings that are not very old. At first, these cracks may look harmless—just a thin line on the wall—but over time they can widen, collect dust, or make the surface look neglected. Many homeowners ignore them, thinking repairs are complicated or expensive, but most small and medium cracks can be fixed at home with simple tools.
For example, a fine crack above a door or window often appears due to natural settling of the building or temperature changes. In many cases, it is not a structural danger, just a surface issue that affects appearance. With the right method, you can restore your wall’s smooth finish without needing professional help.
This guide explains easy, practical, and safe DIY steps to repair wall cracks and keep your home looking clean and well-maintained.
Understanding Why Wall Cracks Appear
Before repairing a crack, it’s important to know why it happens. This helps prevent it from coming back.
1. Natural Settlement of the Building
As a house settles over time, minor cracks can appear in walls, especially in new buildings.
2. Temperature and Moisture Changes
Heat, cold, and humidity cause materials to expand and contract, leading to small cracks.
3. Poor Construction or Plaster Quality
Weak plaster or low-quality materials can cause early cracking.
4. Structural Movement
Slight movement in the building structure can lead to visible cracks, especially near joints.
Understanding the cause helps you choose the right repair method and avoid repeated damage.
Types of Wall Cracks You May Notice
Not all cracks are the same. Identifying them is the first step.
1. Hairline Cracks
Very thin cracks that usually appear on painted surfaces. These are mostly cosmetic.
2. Small Surface Cracks
Slightly wider cracks that affect plaster but not deep structure.
3. Medium Cracks
More visible cracks that may need filling and reinforcement.
4. Structural Cracks
Wide or deep cracks that may indicate serious issues and often require professional attention.
For DIY repair, most homeowners deal with hairline and small surface cracks.
Step-by-Step Guide to Repair Wall Cracks
Step 1: Clean the Crack Area
Start by removing dust, loose paint, or debris from the crack.
Use a brush or dry cloth for cleaning.
Why it works: A clean surface helps repair material stick properly and last longer.
Step 2: Widen the Crack Slightly (If Needed)
For small cracks, gently widen them using a scraper or knife.
This may sound unusual, but it helps repair filler reach deeper.
Why it works: A slightly open crack allows better bonding and prevents future re-cracking.
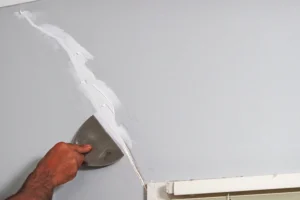
Step 3: Apply Wall Filler or Putty
Fill the crack using wall filler, plaster, or putty.
Use a putty knife to press the material inside the crack.
Why it works: Filler seals the gap and restores the wall’s smooth surface.
Apply in thin layers for better durability.
Step 4: Smooth the Surface
After filling, level the area so it blends with the rest of the wall.
Why it works: A smooth finish ensures the repaired area is not visible after painting.
Let it dry completely before moving to the next step.
Step 5: Sand the Area
Once dry, lightly sand the repaired area.
This removes uneven spots and creates a uniform surface.
Why it works: Sanding helps the paint stick evenly and improves final appearance.
Step 6: Repaint the Wall
Apply matching paint over the repaired area.
For best results, paint a slightly larger section to blend the color evenly.
Why it works: Painting restores the original look and hides repair marks.
Common Mistakes to Avoid
Many DIY repairs fail due to small mistakes:
- Ignoring dust and not cleaning before repair
- Using too much filler at once
- Skipping sanding after drying
- Painting too early before drying
- Ignoring repeated cracks without checking cause
Avoiding these improves both appearance and durability.
Preventing Wall Cracks in the Future
Repair is important, but prevention is even better.
1. Maintain Proper Humidity
Too much moisture can weaken plaster and paint.
2. Use Quality Paint and Materials
Good-quality paint reduces surface cracking.
3. Avoid Heavy Wall Impact
Do not drill or hammer unnecessarily into weak wall areas.
4. Inspect Walls Regularly
Early detection helps prevent small cracks from becoming larger.
5. Fix Leaks Quickly
Water leaks behind walls can cause serious cracking over time.
Safety Tips for DIY Wall Repair
Even simple repairs should be done carefully.
- Wear gloves when handling filler or chemicals
- Work in a ventilated space
- Avoid inhaling dust while sanding
- Use proper tools instead of makeshift items
- Stop if cracks appear structural or deep
Safety ensures better results and prevents damage.
When You Should Call a Professional
DIY repair is effective for small cracks, but not always enough.
Seek expert help if:
- Cracks are wide or growing
- Multiple cracks appear across rooms
- Walls feel damp or unstable
- Cracks reappear after repeated repair
These may indicate deeper structural issues.
FAQs: Wall Crack Repair
1. Can I fix wall cracks without professional help?
Yes, small and surface-level cracks can be easily repaired at home.
2. Why do cracks keep coming back?
This may happen due to moisture, poor plaster, or structural movement.
3. What is the best material for wall crack repair?
Wall filler or putty works best for most small cracks.
4. Do cracks always mean structural damage?
No, many cracks are just surface-level and not dangerous.
5. How long does DIY crack repair last?
If done properly, it can last for years without issues.
Conclusion
Wall cracks are common in every home, but they don’t always require expensive or complicated repairs. Most small cracks can be fixed easily with basic tools, proper cleaning, and careful application of filler and paint.
The key is to act early before cracks expand or become more visible. With regular maintenance and simple DIY care, you can keep your walls smooth, strong, and visually clean. A little attention today can help maintain a beautiful and well-kept home for years to come.